
CC BY 4.0 (除特别声明或转载文章外)
如果这篇博客帮助到你,可以请我喝一杯咖啡~
1. 实验内容
设置自己的DNS服务器。在windows或者Linux操作系统上,安装BIND软件,并为一些简单的名称配置它。使用诸如Domain Information Groper (DIG)的软件来测试你的配置。应确保你的DNS数据库包含有名称服务器、邮件服务器和标准服务器的记录。注意,如果你是在名为HOSTNAME的机器上运行BIND,就能解析形如RESOURCE-NAME.HOSTNAME的名称。
2.解决方案
实验环境的选择为ubuntu18.04, 实验中在自己主机上搭建了服务器,同时也在自己主机上(client)进行测试,实验主要分以下几个部分,
- server上安装bind
- 设置server的配置文件
- 往bind的配置文件里面添加根区域
- 编写资源记录文件
-
设置client客户端的默认dns
- 本机测试
安装bind
sudo apt-get update
sudo apt-get install bind9 bind9utils
设置server的配置文件
-
首先,在 /etc/bind/目录下创建一个 db.shuitang.com文件, 这个文件是原来记录接下来自己设置的dns服务器里面资源的内容,后面会解释如何编写这个文件.
-
然后, 到/etc/bind目录下,修改names.conf.default-zones, 添加如下内容:
zone "shuitang.com"{
	type master;
	file "/etc/bind/db.shuitang.com";  //这个文件是刚刚创建的那个文件
};
表示在添加了一个新域: “shuitang.com”
-
编写db.shuitang.com,内容如下:
$TTL 604800 @ IN SOA primary.shuitang.com. admin.shuitang.com. ( 20 604800 86400 2419200 604800 ) @ IN NS primary.shuitang.com. primary IN A 172.26.5.123 ;Mail shuitang.com. IN MX 10 mail.shuitang.com. mail IN A 172.26.5.123 www IN A 172.26.5.123 bbb IN A 172.26.5.123 -
编辑named.cond.options(也在/etc/bin/目录下)
打开监听操作: 添加下面两条语句
listen-on port 53 {127.0.0.1;172.26.5.123; };   # 此处填写ns1的内网IP地址。仅在内网监听
        allow-transfer { none; };      # 默认禁用zone transfer
在文件中的视图:
options { directory "/var/cache/bind"; //recursion yes; # 启用递归寻址 //allow-recursion { trusted; }; # 允许“trusted”列表前来递归寻址 listen-on port 53 {127.0.0.1;172.26.5.123; }; # 此处填写ns1的内网IP地址。仅在内网监听 allow-transfer { none; }; # 默认禁用zone transfer // If there is a firewall between you and nameservers you want // to talk to, you may need to fix the firewall to allow multiple // ports to talk. See http://www.kb.cert.org/vuls/id/800113 // If your ISP provided one or more IP addresses for stable // nameservers, you probably want to use them as forwarders. // Uncomment the following block, and insert the addresses replacing // the all-0's placeholder. // forwarders { // 0.0.0.0; // }; //======================================================================== // If BIND logs error messages about the root key being expired, // you will need to update your keys. See https://www.isc.org/bind-keys //======================================================================== dnssec-validation auto; auth-nxdomain no; # conform to RFC1035 listen-on-v6 { any; }; }; -
配置完成,重启服务
service bind9 restart
设置客户端的默认dns
修改客户端/etc/resolv.conf文件
nameserver 172.26.5.123
#nameserver 127.0.1.1
测试
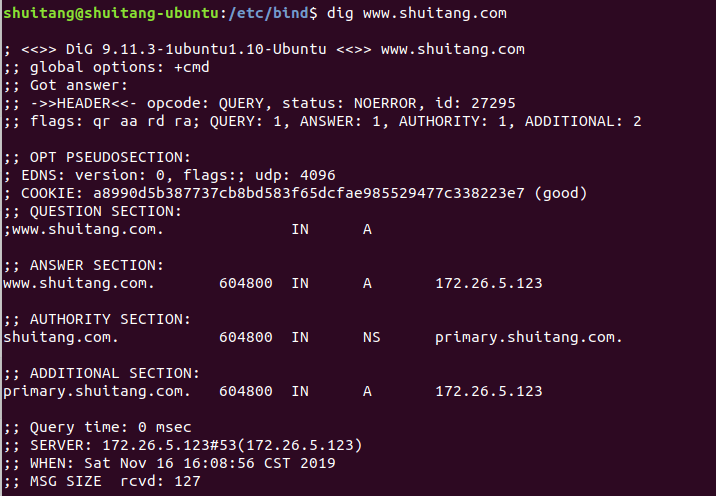
dig www.shuitang.com
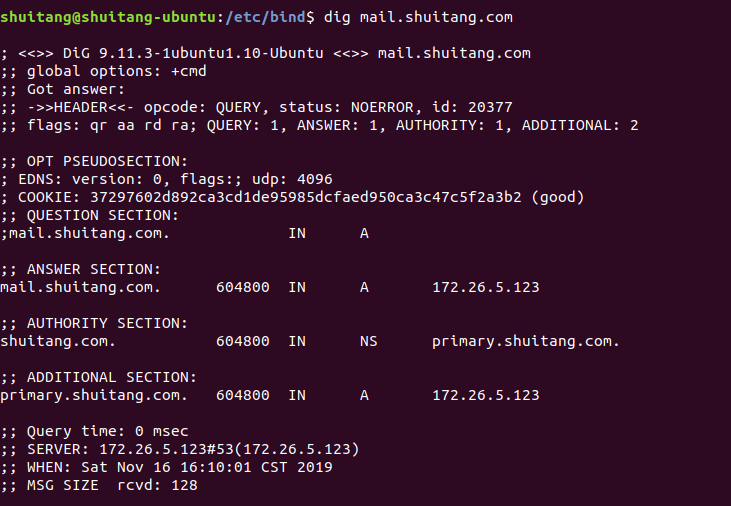
dig mail.shuitang.com
参考
Beginner’s guide to implementing DNS server using BIND: https://linuxtechlab.com/configuring-dns-server-using-bind/ , 2019-11-16
DNS中SOA是什么: https://www.zhihu.com/question/35428551 , 2019-11-16
https://blog.csdn.net/lyhdream/article/details/77620932 , 2019-11-16